检测人脸有很多用处, 可以提供更好的交互, 和一些有针对性的意见. 检测脸部关键信息, 也可以处理一些微表情的内容.
Google推出了官方的人脸检测功能, 很不幸依赖Google Service, 需要版本8.1以上. 国内手机基本不会默认配置. 下载地址, 此版本适配手机系统4.4+.
本文的GitHub下载地址
关注:
(1) 如何提取人脸(Face)位置.
(2) 如何提取脸部关键点(Landmark)位置.
(3) 如何在画布(Canvas)创建居中图片控件.
我讲解一下用法, 写了一个简单的显示控件, 注释详细.
配置项目
新建HelloWorld项目, 配置build.gradle.1
2compile 'com.google.android.gms:play-services-vision:8.1.0' // 包含人脸识别类
compile 'com.jakewharton:butterknife:7.0.1'
一般都会从最基础的HelloWorld开始, 方便学习和理解. ButterKnife必用.
检测人脸控件
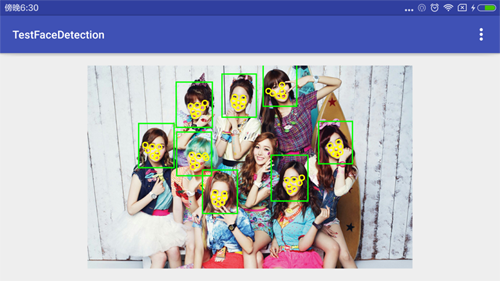
控件居中显示一张图片, 在图片上, 绘制人脸位置和关键点(Landmarks).
关键点包括: 眼睛, 鼻子, 嘴等属性. 存在遮挡, 根据不同人脸提取量不同.
通过FaceDetector检测Bitmap, 获取图片的所有脸部(face)信息.
根据位置(Position)画出脸的形状, 根据关键点(Landmarks)画出脸部特征.
同时可以获取各种特征的概率(Probability), 和脸部偏移.
1 | /** |
图像和特征是显示在画布上, 根据画布大小, 等比例缩放, 并居中显示.
主页面
主界面通过一个简单的ViewPager连续显示图片.1
2
3
4
5
6
7
8
9
10
11
12(R.id.main_vp_container) ViewPager mVpContainer; // 连续
protected void onCreate(Bundle savedInstanceState) {
super.onCreate(savedInstanceState);
setContentView(R.layout.activity_main);
ButterKnife.bind(this);
Toolbar toolbar = (Toolbar) findViewById(R.id.toolbar);
setSupportActionBar(toolbar);
mVpContainer.setAdapter(new FacesViewPagerAdapter(getSupportFragmentManager()));
}
适配传递参数, 根据参数, 返回不同的图片页面.1
2
3
4
5
6
7
8
9
10
11
12
13
14
15
16
17
18
19
20
21/**
* 脸部适配器
* <p/>
* Created by wangchenlong on 15/12/15.
*/
public class FacesViewPagerAdapter extends FragmentPagerAdapter {
private static final int NUM = 9;
public FacesViewPagerAdapter(FragmentManager fm) {
super(fm);
}
public Fragment getItem(int position) {
return ShowFaceFragment.newInstance(position);
}
public int getCount() {
return NUM;
}
}
每页是个Fragment, 根据参数, 使用不同资源.1
2
3
4
5
6
7
8
9
10
11
12
13
14
15
16
17
18
19
20
21
22
23
24
25
26
27
28
29
30
31
32
33
34
35
36
37
38
39
40
41
42
43
44
45
46
47
48
49
50
51
52/**
* 显示人脸的界面
* <p/>
* Created by wangchenlong on 15/12/15.
*/
public class ShowFaceFragment extends Fragment {
private static final String ARG_SELECTION_NUM = "arg_selection_num";
(R.id.main_fdv_face_detector) FacesDisplayView mFdvFaceDetector;
ArrayList<Integer> mPhotos; // 图片集合
public ShowFaceFragment() {
mPhotos = new ArrayList<>();
mPhotos.add(R.raw.total_large_poster);
mPhotos.add(R.raw.jessicajung_large_poster);
mPhotos.add(R.raw.seohyun_large_poster);
mPhotos.add(R.raw.sooyoung_large_poster);
mPhotos.add(R.raw.sunny_large_poster);
mPhotos.add(R.raw.taeyeon_large_poster);
mPhotos.add(R.raw.tiffany_large_poster);
mPhotos.add(R.raw.yoona_large_poster);
mPhotos.add(R.raw.yuri_large_poster);
}
public static ShowFaceFragment newInstance(int selectionNum) {
ShowFaceFragment simpleFragment = new ShowFaceFragment();
Bundle args = new Bundle();
args.putInt(ARG_SELECTION_NUM, selectionNum);
simpleFragment.setArguments(args);
return simpleFragment;
}
public View onCreateView(LayoutInflater inflater, @Nullable ViewGroup container, @Nullable Bundle savedInstanceState) {
View view = inflater.inflate(R.layout.fragment_show_face, container, false);
ButterKnife.bind(this, view);
return view;
}
public void onViewCreated(View view, @Nullable Bundle savedInstanceState) {
super.onViewCreated(view, savedInstanceState);
int image = mPhotos.get(getArguments().getInt(ARG_SELECTION_NUM));
InputStream stream = getResources().openRawResource(image);
Bitmap bitmap = BitmapFactory.decodeStream(stream);
mFdvFaceDetector.setBitmap(bitmap);
}
public void onDestroyView() {
super.onDestroyView();
ButterKnife.unbind(this);
}
}
注意使用注释(Annotation), 判断资源类型, 如
@RawRes.
有时间再完善一下这个小控件吧.
OK, that’s all! Enjoy It!
原始地址:
http://www.wangchenlong.org/2016/03/22/1603/225-face-detect/
欢迎Follow我的GitHub, 关注我的简书, 微博, CSDN, 掘金, Slides.
我已委托“维权骑士”为我的文章进行维权行动. 未经授权, 禁止转载, 授权或合作请留言.